

Use this guide to create a host account, configure a room, invite participants with a room code, and review the session report.
What You'll Learn
- How to create your host account
- Setting up your first monitoring room
- Configuring your website whitelist
- Monitoring participant activity in real-time
- Reviewing session reports
Step 1: Create Your Host Account
Create an account at Focus Room with your name, email, and password. When signup completes, Focus Room redirects you to the admin dashboard.

Step 2: Create Your First Monitoring Room
A room is your virtual focus session. Each room has its own whitelist and unique room code.
Creating a Room
- From your dashboard, click the "Create New Room" button
- Enter a descriptive room name:
- "Team Standup - Monday"
- "Workshop - Web Development"
- "Focus Session - Research"

- Configure your whitelist by typing website domains and clicking "+" to add them:
wikipedia.orggoogle.comnotion.so

- Click "Create Room"
- Your room appears in the Active Rooms section with a unique 6-character room code

Note: Focus Room automatically whitelists
wayground.comandzoom.comfor you. You can remove or keep them to your needs.
Step 3: Share Your Room Code with Participants
Your room code is displayed in your room's monitoring dashboard.
How to Share
- Click "Monitor" on your room card to open the monitoring dashboard
- Find the room code below the room name
- Click the copy button next to the room code
- Share it with participants via:
- Video call announcement
- Slack, Teams, or other messaging
- Email or calendar invite

Participant Requirements
Participants need:
- ✅ Chrome or Microsoft Edge on desktop
- ✅ Focus Room extension for Chrome or Microsoft Edge
- ✅ Your 6-character room code
- ✅ Their name
Quick instructions for participants:
Step 1: Install the extension for your browser using one of the store links above, then open it from the browser toolbar.
Step 2: Enter Room Code
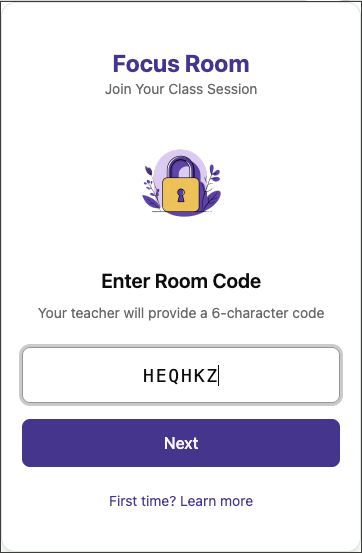
Enter the 6-character room code from your session host.
Step 3: Enter Your Name
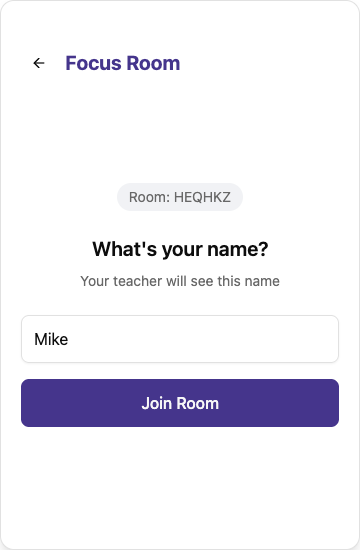
Type your full name and click "Join Room".
Step 4: Join Room
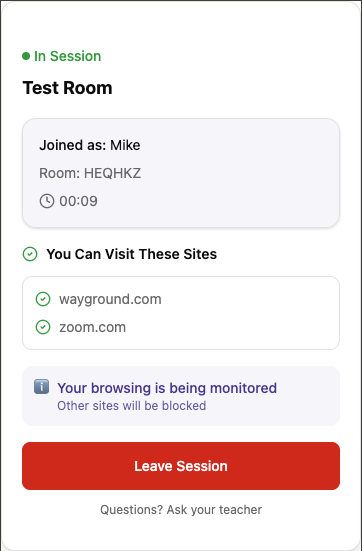
Review the approved sites list once you are connected.
Step 4: Monitor Your Session
Once participants join, you'll see them in your monitoring dashboard.
Understanding the Dashboard

Top Section:
- Connection Status (green dot = connected and listening)
- Room Code with copy button
- End Session button (red, top right)
Three Info Cards:
- 👥 Active Participants - Number of participants currently in the room
- 🌐 Whitelisted Sites - Total allowed websites
- ⚠️ Total Violations - Cumulative violation count
The Three Tabs
1. Overview Tab
Shows active participants and recent violations:
- Participant List (left) - Names, join times, and violation counts
- Recent Violations (right) - Last 10 violations in real-time
2. Violations Tab
Complete violation history with filters:
- Participant name
- Website URL blocked
- Timestamp
- Violation type

3. Whitelist Tab
Manage allowed websites during your session:
- View all whitelisted domains
- Add new sites in real-time
- Remove sites as needed

Tips: You can add/remove sites in real-time to allow for quick adjustments per your need.
Step 5: End Session & Review Report
When the session is over:
- Click "End Session" (red button, top right)
- Confirm you want to end the session
- Review your session report
Session Report Includes

Summary Statistics:
- Total participants
- Session duration
- Total violations
- Completion rate (% who stayed connected)
Participants Table:
- Participant names
- Join/leave times
- Duration in session
- Individual violation counts
Exporting Reports
Need to save the data for records?
- Click "Export Excel" at the top of the report
- Download the
.xlsxfile - Use for attendance, documentation, or analysis
Tips for Success
🎯 Recommended Sites to Whitelist
Research & Reference:
wikipedia.orggoogle.combritannica.com
Productivity Platforms:
notion.sodocs.google.comdrive.google.comoffice.com
Collaboration:
figma.commiro.comslack.com
Development & Technical:
github.comstackoverflow.comreplit.com
Pro Tip: Start with 5-10 essential sites and add more as needed. You can modify your whitelist anytime, even during an active session!
✅ Best Practices
Before the Session:
- Create your room and whitelist the night before
- Test your whitelist by visiting those sites yourself
- Share the room code 5 minutes before the session starts
- Remind participants to install the extension beforehand
During the Session:
- Verify all participants appear in your participant list
- Check the Overview tab when participants should be joining
- Don't over-react to violations - most are accidental
- Add new sites to your whitelist as legitimate needs arise
After the Session:
- Review the session report for patterns
- Export the report if needed for documentation
- Adjust your whitelist for next time based on what worked
Need Help?
- 📧 Email: [email protected]
- 📚 Visit our Support page
Congratulations! You're ready to use Focus Room to help your participants stay focused. Remember, Focus Room works best as a focus assistant to help everyone develop better online work habits.
Happy hosting!
Have questions or feedback? We'd love to hear from you at [email protected]